There’s little we love more than following a Cricut Maker tutorial.
This week, we decided to mix it up with a paper crafting project — making these cute triangle boxes.
It’s quick, it’s easy, and it’s the perfect project for anyone wanting to make some beautiful gift wrapping with the Maker.
You need minimal materials and supplies, so this is a great beginners’ tutorial — or even just for anyone in a bit of a squeeze time-wise.
We’ll run through exactly what you need to complete the project, as well as how to find it in Design Space, and how to eventually make it.
We even got our intern to film a little video of her going through every step. If she can do it, anyone can!
Let’s get straight into it…
Post Contents
What You Need
As we mentioned before, you don’t need a lot to be getting on with this project, thank goodness! You might even have a lot of it already in your craft room.
- 6 sheets of 12″ x 12″ light cardstock in the patterns of your choice (we went for a jungle theme!)
- Cricut Maker
- LightGrip Machine Mat
- Single or Double Scoring Wheel or Scoring Stylus
- Embellishments
- Hot Glue Gun
Method
Find Project On Design Space
This is actually a Cricut Access project and so can easily be found on Design Space.
Cricut Access is a subscription that gives you access to over 50,000 images and hundreds of fonts, as well as loads of ready-to-make projects, from just $7.99 a month.
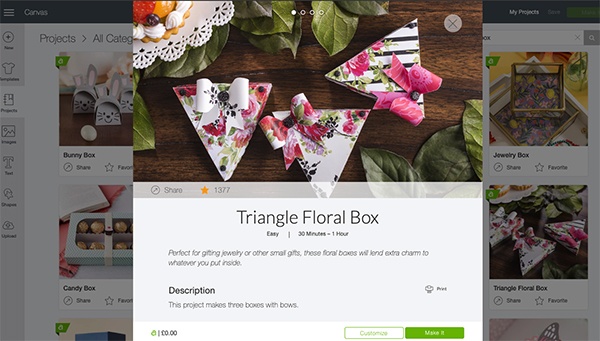
Open up your canvas and click on Projects in the left hand tab. Under all categories, search for “Triangle Floral Box” and you should come up with this:
Simply click on that little green button saying “Make It” in the bottom right hand corner.
Time To Cut
This will take you direct to the cut preview screen so you can see exactly what the Maker will be cutting.
You’ll see that the project is comprised of 6 mats, and you should use different patterned paper for each mat to really make the most of it.
Once you’re happy with how the mats are looking, click on the green button in the right hand corner that says “Continue”.
At this point, your computer will connect up with the Cricut Maker and you’ll need to select your material and the tools you’re using.
We selected “Light Cardstock” and opted for the Scoring Stylus and Fine Point Blade as we don’t have a Cricut Scoring Wheel yet.
Now it’s time to load your first mat, select “Fast Mode” and press Go…
Eventually, you’ll be left with…
And now it’s time to get assembling.
Assemble the Base and Lids
This project makes a total of three boxes, comprising three separate bases, three lids and three bows.
Your first task is to assemble the bases.
The base cuts are those with straight edges — the cuts with scalloped edges are for the lids.
Firstly, fold along the score lines of the edges and tabs, then take your glue gun and glue the tabs in such a way that it creates a 3D box base.
Do the same for the three lids and fit both halves of the boxes together.
You’ll be left with something like this:
Assemble the Bows
The penultimate part of this easy paper box tutorial is assembling the separate parts of the bows together.
There are two parts to each bow: the bow tie shape and the trailing ribbon.
Firstly, you need to fold the bow tie along the score lines, then take each end and bend it back to make a 3D bow shape. Use your hot glue gun to hold it in place.
And then glue the ribbon part to the back of the bow, so it looks something like this:
And finally, glue an embellishment to the middle of the bow to give it a bit of sass!
Affix the Bows to the Boxes
And finally, you need to take your hot glue gun and glue those bows to the box lids.
You can arrange them however you like!
And that’s that — a super easy paper box tutorial with the Cricut Maker!
What’s your favorite thing to make with the Cricut Maker?
For more tutorials and guides aimed at helping you get the most out of your machine, be sure to visit our How To section.


