We know it’s not quite December yet, but we can’t stop making Christmas decorations with our Cricut Maker!
On our hit list this week was this beautiful snowy village scene — something that would look supremely festive on your mantelpiece or even around the base of your tree.
It’s a super easy project with the help of Cricut Access and the Cricut Maker — we’ve created this step-by-step guide so you’ll know what you’re doing every step of the way.
And for those of you who prefer a more visual how-to guide, check out this video of our intern having a go at this Cricut Maker Christmas project:
If she can do it, anyone can!
Let’s get straight to it.
Post Contents
What You Need
- Cricut Maker (or any cutting machine will do!)
- 5 pieces of 12″ x 12″ white cardstock
- 4 pieces of 12″ x 12″ coloured cardstock or vellum
- LightGrip Adhesive Cutting Mat
- Spray Adhesive
- Glitter
- Tape
Method
Find the Project on Cricut Access
We’ve said it before and we’ll say it again — we love Cricut Access.
From just $7.99 a month, you get access to over 50,000 images and hundreds of fonts, as well as loads of ready-to-make projects like this.
Simply launch Design Space, head to your canvas and click on the Projects tab on the left hand side.
In the search bar, type “Christmas Village”, which will lead you to this project:

And click ‘Make It’ to begin.
Start Cutting
The Design Space screen will then show you how many mats you need to prepare (9 in total) and will prompt you to start loading the first of them to begin the cutting phase.
You’ll need to select the material you’re using as well at this point. We chose Light Cardstock (60 lbs) but you may need to adjust this if you’re using heavier or lighter materials.

Also remember that you can adjust the size of your materials in the mat thumbnails that run down the left hand side of the screen. For example, we changed ours to A4 size as we only had this size card on hand (just remember that smaller materials equal more mats to load and cut!).
Once you’re all set in Design Space, it’s time to load up your mats one-by-one into the Cricut Maker and begin the cutting process.
Eventually you’ll end up with all these individual pieces of cut cardstock:

Assemble the Houses
Now you’ll need to use some adhesive to stick each house together, but leave the little snowy details to one side for now.
As you can see from the photo above, it’s clear that the solid color blocks are the background pieces while the more intricately cut white pieces are the front details. Glue these white pieces to the solid color blocks that best fits their shape.
That should lead you to a group of houses that look a little like this:

Time to Get Glittery
Now’s the time to accidentally stick yourself with spray adhesive and turn into a glitter monster for the rest of the day… or something. That definitely didn’t happen to us 😎
No, in fact now it’s time to decorate those snowy details that you set aside earlier with a bit of glitter.
We chose silver glitter as it best represents snow in our minds, but feel free to go crazy and do something a little different if you dare!
We’d recommend setting down a bunch of newspaper and laying each snowy detail out on this before you take your spray adhesive to work.
And make sure you’re in a well ventilated room away from any kids or pets when you use it, as that stuff does not smell good.
Aiming the can around 15 cm away from the target, spray the adhesive as evenly as possible over each detail, before shaking glitter onto each piece.
We’d recommend spraying and glittering each piece one at a time, individually, as the spray adhesive usually dries very quickly.
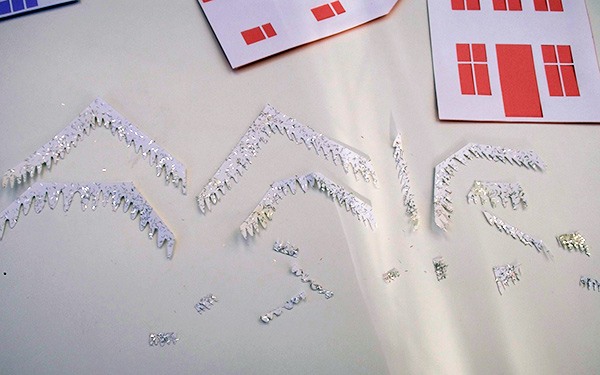
Soon you’ll end up with a selection of snowy details that look something like this:
Stick the Snowy Details to the Houses
We found this next step a little tricky but it shouldn’t take you too long if you have a little patience.
Before you whip out the glue stick, we’d recommend taking some time to match each snowy details to a house, making sure that it fits the shape and that there’s an even amount distributed on each house.
At this point, you can then adhere each detail to each house, leaving you with a group of beautiful snowy houses:

Assemble the Village
Once all the glue is completely dry, turn each house over and arrange them in the order you’d like them to be together.
Then tape the joints of each house together, allowing some movement so you’ll be able to arrange the houses in a concertina effect like this:


Looking beautiful!
And that’s it — let us know what Christmas decorations you’re making with your Cricut Maker this year!
For more tutorials and guides aimed at helping you get the most out of your machine, be sure to visit our How To section.
Beautiful! What a wonderful homemade decoration – just perfect!